Creating a new area from scratch 2
by Zakyrus
Skill Level: Beginner / Intermediate
Estimated Editing Time: About 5-10 minutes
Requirements: (besides a backup of a CT ROM and the Temporal Flux editor)
- Basic knowledge of location pointers and map pointers.
- Know how to use tile properties such as solidity, movement, and layering properties.
I am going to assume you know about using location pointers and map files somewhat. If not, there is a tutuorial on the Chrono Compendium that explains how to make a new location from scratch. However, this tutorial is pretty straightforward so even if you don't, you should be able to figure it out. Temporal Flux can make BRAND NEW locations from an empty map but most people are not aware of this. In this tutorial, I am going to explain how to use an empty location/map file to make an extension to the Magic Cave.
- Preparations
Make a backup copy of your CT ROM. I will assume if you are editing with Temporal Flux, you have a CT ROM. Asking me or anyone at the Chrono Compendium for a ROM will probably get you laughed at or dusted away, or possibly your soul consumed by Lavos! >:-) Anyways, once you have a backup made of your ROM, take the original and put it somewhere you will know to never, EVER touch or modify. If you screw up your ROM, you can just make another copy of the unmodified one to edit. Also, my advice would be to make periodic backups everytime you make alot of changes. This way, if you find a bug, you can go back a version (or a few if unfornately need be).
- Step 1
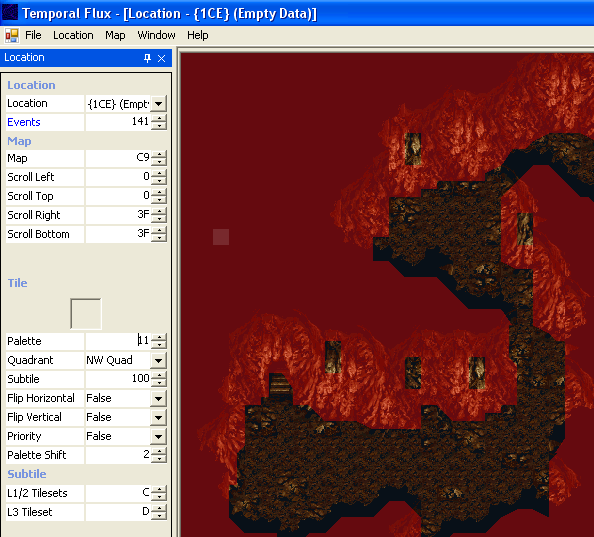
Find an empty location pointer. For this, I used location 1CE. You can use any loc pointer that's free; there are (I think) around 30 free location pointers (most of them have "wrong map" in their names). Once you have found a victim, er, I mean location pointer, change the MAP to C9, which is completely blank. MAPS C9 to FF are unused, meaning that there should be 54 free maps in the ROM, although don't quote me on that. The only problem is that there are a limited amount of location pointers. In a later tutorial I will explain how to remove "Lavos Attack modes" to free up a few more location pointers. This should get most of us by until someone can make an editor that expands the total of location pointers (and hopefully maps too).
- Step 2
Change the Scrolls, Palette, Subtile, Palette Shift and L1/2 & L3 Tilesets to those shown in the screenshot below.
- Step 3
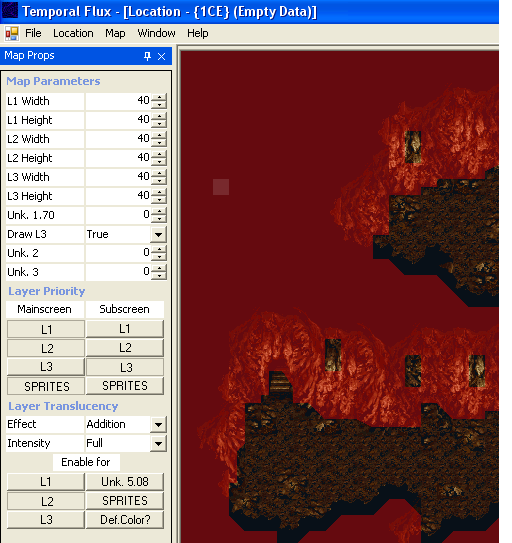
Load the Map Properties Tab, (Window Menu > Locations > Map Properties) and change everything so that it matches the screenshot below. What we have been doing is copying the location and map parameters from 0A4 Magic Cave. You can modify this later if you wish; we are simply using that location as a base.
- Step 4
TF does not allow you to copy tiles from one location and drag it to another. OR DOES IT? Indeed it does, but you kind of have to cheat. You can change the map file to another map, select the tiles you want to copy and change the map back to the one you had previously and paste! How convenient! (It's amazing the things you discover when you haven't slept for 2 days because you're modding CT.) So, change the map to 74; copy all tiles from layer 1, change the map back to C9 and paste. Do this for layers 2 & 3. Pretty cool, huh? Just remember to write the location to memory before switching maps after you pasted tiles. While you are at it, you can do this for the solidity tiles (or any tile props) as well.
Also, I will note that an easier way to steal an entire map file would be to export it and import into the blank map file. The described method we used in this tutorial is more useful for copying a few tiles from a location that uses the same tileset, rather than the entire map. However, I just did it here so that you are aware of the fact that it can be done. Just make sure that the map sizes match up (if the map you exported is 40 wide and 10 tall, change the location map properties of the slot you're importing to to match those settings).
The better (and quicker) method is:
- Go to File>Export
- Choose Location Maps in the combo box, then hit the "..." button next to filename to load a save window
- Choose a a name and hit save; this creates a file to export data to.
- Then in slot type 74 and hit export.
~
- Now, to import it go to File > Import
- Click the button next to filename
- Change the slot to whatever map file you want to import it to, in this case map C9
- Hit Ctrl-Shift-S or File>Save to save.
- Now your imported map will be saved to that address; load up (or reload) location 1CE and change the map to C9
- Importing will not work well if the map size is too small. (i.e. importing a map with Layer 2 width of 20, when the width is set to 10). As suggested above, make sure the location map properties are the same.
Now you have yourself a copy of the Magic Cave in a new location pointer. You don't have to use the Magic Cave; you can use whatever you want. I just used it for this example because I am making a second floor to the Magic Cave and I figured I would write a tutorial....I sure bet you are glad I did, aren't you? :) This is one good way to start a new area for beginners. This is because you don't have to worry about getting all the layers correct when drawing the location by adding tiles to a blank map...you can just modify and adjust as needed. You will also notice that with the screen scroll and layer widths / heights there is alot of extra space; this is for your modding pleasures. I will also note that exporting / importing is a good way to backup your work. If you screwed up a single location, you can just import a fresh one from an unmodified ROM.
- Step 5
Now all you have to do is add exits to and from the location! I am not really going to go into exits here, for the TF Manual has documentation on it. If you want to, you could export the exits using the above technique. Just remember that you want the location pointer not the map number.
One other thing that I almost forgot is that you have to add event code, otherwise your location won't load properly. You can do this by stealing from another location; you can either load another location and copy (CTRL-C) event objects and paste them into the event code for this location, or you can use the export / import function. Just be sure that if you are exporting, that you are aware of the fact that event (script) data is based off of the location pointer number and not the map number just like the exit data. You will notice that this location (1CE) at first has a lot of objects. Delete all of these first, then paste the new ones in. CT can only have 40 objects in a location or it will either crash or freeze when loading. The only objects really required for a location to load are the 7 playable characters, so make sure you have those somewhere.
- Final notes
Well, that about does it for now. You can go forth and mod the crap out of this location and change tiles so that players won't know that you completely ripped off the Magic Cave. Many more tutorials are being planned, I do have about 10 more made that I'll upload soon. I hope to create a whole series of them. This way, we can get more tutorials for begginers and hopefully some of you will figure something new/useful out and write a few of your own! Also, this expands the knowledge contained in the Chrono Compendium...May the Chrono Compendium live forever~! (and NOT the kind of forever that the Kingdom of Zeal obtained, LOL). There will be a few more basic tuts, then a good amount of intermediate, and mostly advanced ones (I only have 1 advanced tutorial made so far).
- Miscellaneous notes
- Exiting back to the same location resets monsters and other things that would normally be reset by leaving the room.
- Can have 2 rooms on the same location pointer far enough away so that you can't see the other room. *Exiting to the "other room" works with above note. This saves the use of 1 free location pointer, at the cost of some free space...May still be useful though, especially if you(like me) are running low on free location pointers.


