Difference between revisions of "Changing the status menu portraits"
(typos) |
|||
| Line 7: | Line 7: | ||
Now, after the Java runtimes are installed, go to the folder where TM is located and simply run tm.jar. | Now, after the Java runtimes are installed, go to the folder where TM is located and simply run tm.jar. | ||
| − | If you have WinRAR installed, or another program that uses .jar files for something other than Java, it gets a bit | + | If you have WinRAR installed, or another program that uses .jar files for something other than Java, it gets a bit trickier. If you know how, reset the .jar file association to the Java runtimes. If not, you can simply run the program with a DOS command line. To do that, |
1. Open MS-DOS<br> | 1. Open MS-DOS<br> | ||
Revision as of 17:03, 22 January 2005
Contents
Tools Needed
Tile Molester
As with most graphic editing, a Tile editor is required. In this tutorial, we are going to use TileMolester ( http://www.stud.ntnu.no/~kenth/tm/ ), which requires Java runtimes. To get TileMolester, simply hit up http://www.stud.ntnu.no/~kenth/tm/#DOWNLOADS and get the TileMolester [Bin]. If you don't have the Java runtimes required, go to http://java.sun.com/j2se/1.5.0/download.jsp and download the JRE 5.0 Update 1, not the JDK program, as the JRE allows average users to run Java programs while JDK is actually a tool for creating them.
Now, after the Java runtimes are installed, go to the folder where TM is located and simply run tm.jar.
If you have WinRAR installed, or another program that uses .jar files for something other than Java, it gets a bit trickier. If you know how, reset the .jar file association to the Java runtimes. If not, you can simply run the program with a DOS command line. To do that,
1. Open MS-DOS
2. Enter the command ' cd (directory/folder where TileMolester is installed, like c:\tilemolester) '
3. Enter the command ' java -jar (your TM filename, such as tm.jar) '.
You can also create a batch file with step three's command in it in the TileMolester directory, or download one here (remember to put it in the TileMolester directory). Now that everything's installed, let us get down to business.
Irfanview
Irfanview is a lightweight image editor that is very easy to use. However, if you have your own and are experienced with it, disregard this. You can obtain Irfanview at http://www.irfanview.com/ .
SNESPal
SNESPal allows you to edit the palettes that Chrono Trigger loads to color its various graphics. Grab it at http://www.romhacking.com/utils/general/palette/snspal03.zip .
Editing the Portraits
Finding them
Portraits, like anything else in the Chrono Trigger ROM, are stored at a certain offset within the game. But first, load the Chrono Trigger ROM within TileMolester. A window should pop up with garbled graphics and pixels. Now, we need to navigate to the correct offsets to find the portraits. This varies if your ROM is headered or unheadered (if you've ever edited it with Temporal Flux, it is unheadered, whereas if you just downloaded it off the internet, it is headered). Use these addresses accordingly:
Unheadered: 3F1D80
Headered: 3F1F80
This process should appear as so:
Now click OK, and the garbled graphics will scroll to the new address in the ROM. Scroll up somewhat and you should see this:
These are the portraits, albeit with the wrong palette (the colors at the bottom of the program). Before we get to editing, we need to fix these portraits so they display correct. Firstly, go to Image > Canvas Size, and make it 6 x 16. Now, notice that they're still a little out of order:
Fix this by hitting the Tile Forward button ![]() until it looks correct:
until it looks correct:
Notice how the portraits are not slightly displaced. We're ready to start editing. You now need to decide which portrait you would like to edit this time around, since we can only do one at a time. In this case, we're going to edit Crono's picture. Now, open ZSNES or SNES9X and play Chrono Trigger until you can open the menu screen that displays the portraits. Make sure Crono's portrait is onscreen, and then make a savestate. Once again, be sure that your savestate is made while viewing this screen:
Now, back in TileMolester, go to Palette > Import From > Another File in the menu. Find the savestate you just made and open it. This has ported all the palette data from your savestate into TileMolester. Below, where the colors are, press the large arrows until Crono suddenly looks right. I've highlighted the button you should press, and the result:
Preparing the edit
Now it's time to find the picture we want to replace Crono. In this tutorial, we're going to replace this strange picture Square gave us with something cooler from one of CuteLucca's fanarts. Now, let's pretend I found this picture:
It's too large for the ROM at the minute; the actual Crono picture in Chrono Trigger is 48x48 pixels, so we're going to have to shrink this down to that size. This can be done with your image editor of choice; if you're stuck with MSPaint, check out Irfanview at http://www.irfanview.com/ . We'll be using Irfanview eventually, too. I resize/resample the picture to this:
Now, recall that Chrono Trigger uses 16-color palettes, but one of the colors is transparent, which brings it down to 15. We'll have to make this image have only 15 colors. In Irfanview, go to Image > Decrease Color Depth > (Custom Amount) 15 Colors. The quality should be sacrificed somewhat, but in your own efforts you can fine tune it. I now have this:
Now save it as a .bmp (bitmap). Before we paste it into TileMolester, however, we need to edit the palette information for Crono's picture within the Chrono Trigger ROM.
Palette editing
This is the most tedious part, but don't worry -- it's pretty simple. Firstly, we need to find Crono's palette with SNESPal. Open the Chrono Trigger ROM. Chickenlump has listed the offsets for each portrait palette:
NAME - Offset
Magus - 3F1F80
Robo - 3F1FA0
Frog - 3F1FC0
Crono - 3F1FE0
Ayla - 3F2000
Lucca - 3F2020
Marle - 3F2040
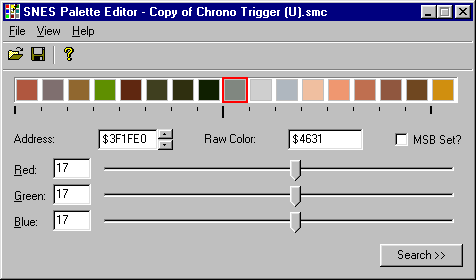
Crono's is 3F1FE0. Open SNESPal and navigate to that offset. You should then see this:
The tile highlighted with red is where Crono's portrait palette begins. We need to edit these colors to correspond with the ones in Irfanview; otherwise, pasting the new Crono picture into TileMolester will force it to conform to Crono's old picture's colors, and will look very ugly. Now that SNESPal is primed and ready, we can begin editing these colors. Back in Irfanview, with the new Crono 48x48 15 color picture loaded, go to Index > Palette > Edit Palette. This will list the 15 colors used to colorize the image of Crono.
Now, notice that when you click on each color in Irfanview, it displays the RGB values at the bottom of the palette window. Starting from left to right, we're going to be changing these values and substituting them into SNESPal. Highlight the first color and read its RGB value: 37, 15, 13. Now divide each by 8: 4.625, 1.875, 1.625. Now, round to whole numbers: 5, 2, 2. Insert these values into the Red, Green, and Blue field of SNESPal. That's one color down; near the Address tab, click the up arrow to go up to the next byte, which should shift all the colors in SNESPal left, so you're working on the next color. Now, in Irfanview, select the second color, convert the RGB values and repeat. Do this until all 15 are in (the last color in Crono's palette is transparent, so we will not be editing it).
Just as a recap,
1. Click first square in Irfanview Palette Info 2. Get RGB Values 3. Divide by eight 4. Insert in SNESPal's Red, Green, Blue fields 5. Go up one address in SNESPal 6. Click second square, etc.
Once everything is done, hit save in SNESPal.
Finishing the edit
We're ready to paste the Crono image into TileMolester over Crono's old portrait. Back in TileMolester, go to Edit > Paste From in the menu and find the bitmap that you saved earlier. Now, paste it over Crono's old portrait.
Don't panic when it doesn't look right; if you saved the palette changes a minute ago, everything should be fine. We're really done! Inside the game, the palette information has been changed; the palette in TileMolester hasn't of course, since it has drawn palette information from the original, outdated savestate. Now, open your emulator, reset your ROM if you've left it on during these changes, load that savestate, and you'll see the original Crono and menu screen. However, close the menu screen and reopen (the old image was present simply because of the savestate). Here he is!
Please report any difficulties on this tutorial's "Talk" page, which can be accessed by clicking Discussion at the very top of this page.
From: Tutorials (Chrono Trigger)
--ZeaLitY 13:29, 21 Jan 2005 (CST)


