Difference between revisions of "Modifying Techs"
(Update for Hi-Tech.) |
m (Formatting error.) |
||
| Line 11: | Line 11: | ||
All techs, at the bare minimum, should have the following at the end of their first caster object. | All techs, at the bare minimum, should have the following at the end of their first caster object. | ||
| − | + | <pre>Object 1 | |
Pause for 0A | Pause for 0A | ||
Unknown 2E | Unknown 2E | ||
End Tech (01) | End Tech (01) | ||
| − | Return | + | Return</pre> |
Pause gives enough of a break in between your animation and any counter attack to look smooth. | Pause gives enough of a break in between your animation and any counter attack to look smooth. | ||
Revision as of 02:38, 9 November 2017
Report bugs and check progress here. Download the tech editor from the link in the first post.
jsondag2: Hey all, I decided to make a short tutorial on how to make some new techs using my tech editor. It's sort of a way to show off what it can do. Before we begin here is the final product after following this tutorial:
Mauron: I've updated this to work with Hi-Tech.
MAKE A BACKUP NOW!
The Necessities
All techs, at the bare minimum, should have the following at the end of their first caster object.
Object 1
	Pause for 0A
	Unknown 2E
	End Tech (01)
	Return
Pause gives enough of a break in between your animation and any counter attack to look smooth. Unknown 2E resets a value. I'm not clear on what or why, but every tech has it. End Tech finishes processing the current tech, and moves back into normal battle. Return marks the end of an object, and Hi-Tech will fail to save if it is not present.
Ice Storm
The first tech we'll create is Ice Storm. Basically we want to throw ice at an enemy. We can replace any tech, but removing the usable in menu flag is difficult at the moment. Let's make this a modified Ice.
Now the key to techs since there's so many unknowns is to use existing techs and edit instead of building from scratch so at this point I copied over data from Slash since I felt it was similar to what I wanted. One of the good things about the latest release of Hi-Tech is data is copied to the clipboard. You can also use Temporal Flux's Import and Export feature if both are in the same list of data (Player Tech, Enemy Tech, Player Attack, etc).
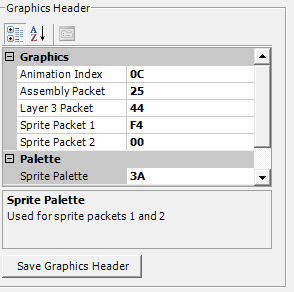
Note the animation index for both Slash and Ice. Go to File -> Export..., choose a filename, set App / Plugin to Hi-Tech, Type to Player Tech Animation, Slot to 2, and click Export. Then go to File -> Import..., choose your exported file, set Slot to C, and click Import. Now you can switch to Ice for editing.
Since we're working with an identical copy of Slash using Ice's graphics header, we don't really need to do much. At this point you can save the ROM and it will look pretty nice.
Slash flies forward and off the screen, so we want to change Ice Storm's targeting to match. Click Save Targeting once you're done.
That's it! If you load up the ROM and cast Cure 2. She should choose an enemy and throw ice at him. You can tweak the animations/sound effects to your liking.
Haste All
OK, I'll try to make this one faster, we're going to upgrade Haste to Haste All.
Since this is will target the whole party, change the targeting from One Ally (0x00) to All Allies (0x01) and click Save Targeting.
Now we'll start on the animation. We want all the party members to animate, so we'll duplicate the target object.
In the Target Objects section, copy Object 2 and paste it back in. (If CTRL+C and CTRL+V doesn't work, you can right click the object and select copy, then paste.)
You'll need to delete Increment Counter 1A Process Draw Geometry flag?, Increment Counter 1B Process Layer 3 flag, and Increment Counter 1D from the New Object. These will mess up flow control if we leave them in.
In the Effect Objects section, we want to create a copy of Object 3. In the new object, delete all commands up to Wait for Counter 1D to reach 02, and both Increment Counter 1D commands below it. Copy this object and paste another one in.
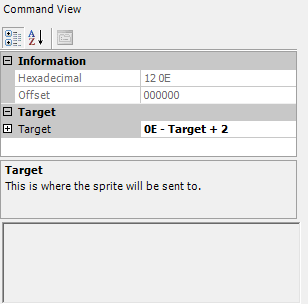
Now we'll change the new objects commands of Store coordinates of target 03 - Target and Slide Sprite to 0C - Target to Store coordinates of target 04 - Target + 1 and Slide Sprite to 0D - Target + 1 and Store coordinates of target 05 - Target + 2 and Slide Sprite to 0E - Target + 2 in the two objects, using the command view above.
We need to move the clocks in order, so starting with Object 3, we'll add flow control instructions. Select Teleport to Stored Coordinates, then go to the command list at the top, select Increment Counter 1C/1D, and click Add Command. Then select Wait for Counter # and click Add Command. (Hi-Tech Beta 22 has a bug with Wait for Counter 1C/1D, or we'd use that.) We'll edit Wait for Counter # to use Counter 1C and a value of 3.
Next we'll edit one of the New Objects. We'll add a Wait for Counter # after Wait for Counter 1D to reach 02, change it to 1C and 01, then add an Increment Counter 1C and Wait for Counter 1C to reach 03 after Teleport to Stored Coordinates. We can delete the Wait for Counter 1D to reach 02.
On the other New Object, we'll do the same, except the first wait for counter 1C will be set to 02.
Your Effect Objects should look something like this:
New Object
	Wait for Counter 1C Flow Control to reach 02
	Set Sprite Priority 03 - In Front of Sprite
	Store coordinates of target 04 - Target + 1
	Set Counter 1F Y Coordinate to 10
	Teleport to Stored Coordinates
	Increment Counter 1C
	Wait for Counter 1C Flow Control to reach 03
	Play Animation (Loop) (01)
	Speed: Fast
	Pause for 28
	Drawing Status: Show
	Slide Sprite to 0D - Target + 1
	Pause for 48
	Drawing Status: Hide
	Return
New Object
	Wait for Counter 1C Flow Control to reach 01
	Set Sprite Priority 03 - In Front of Sprite
	Store coordinates of target 05 - Target + 2
	Set Counter 1F Y Coordinate to 10
	Teleport to Stored Coordinates
	Increment Counter 1C
	Wait for Counter 1C Flow Control to reach 03
	Play Animation (Loop) (01)
	Speed: Fast
	Pause for 28
	Drawing Status: Show
	Slide Sprite to 0E - Target + 2
	Pause for 48
	Drawing Status: Hide
	Return
Object 3
	Teleport Sprite to 09 - Caster
	Set Sprite Facing 03 - East
	Set Sprite Priority 00 - Behind Sprite
	Set Palette to 00
	Load Graphics Packet 1, Unknown: 30
	Wait for Counter 1D to reach 01
	Drawing Status: Show
	Play Sound 86, Unknown: 00
	Play Animation (Loop) (00)
	Pause for 0A
	Speed: Normal
	Set Angle C0
	Move forward. Distance: 0A
	Speed: Fast
	Move forward. Distance: 0A
	Speed: Fastest
	Move forward. Distance: 32
	Drawing Status: Hide
	Increment Counter 1D
	Wait for Counter 1D to reach 02
	Set Sprite Priority 03 - In Front of Sprite
	Store coordinates of target 03 - Target
	Set Counter 1F Y Coordinate to 10
	Teleport to Stored Coordinates
	Increment Counter 1C
	Wait for Counter 1C Flow Control to reach 03
	Play Animation (Loop) (01)
	Speed: Fast
	Pause for 28
	Drawing Status: Show
	Slide Sprite to 0C - Target
	Increment Counter 1D
	Pause for 48
	Drawing Status: Hide
	Increment Counter 1D
	Return
The exact pattern of the wait for counter 1C and Target + ? doesn't matter. Counter 1C was used so we didn't have to mess with any wait for counter 1D commands that were already set up, and we grouped them so they'd go to the right places. Without the grouping, they'd all draw over one PC and move out.


